I Aspire To Be Crafty
Wednesday, September 1, 2010
DIY Portrait #2
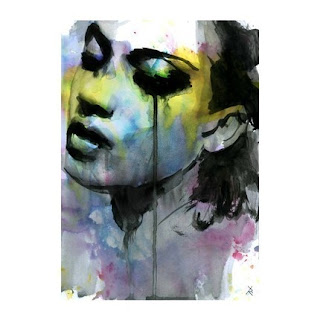
So when I was initially looking for inspiration for an interesting/awesome DIY portrait, this is pretty much exactly what I was looking for. This style is super eye-catching and simple enough to execute. It is by Italian Vincenzo Rizzo and he is amazing. The real trick to something like this is the thought process behind it. It can be simple to do, but only if you are at least a little artistically inspired.
You will need:
1-Watercolors
2-Chosen surface (watercolor paper, mat board, etc.)
3-Image
4-Transfer paper
All of his pictures are mixed media, but I thought I'd stick with watercolors for sake of simplicity on this one. You're welcome to use anything you like (lots of his have printed words and stuff underlying) including sharpies to define the darkest parts. It's really a personal decision, but like I said, I'm trying to make this as simple as possible.
First you need to do a wash over your surface with water so that the colors you lay down will bleed and run. This is desired. Add colors. Keep it down to a simple few. No point in murking everything up. I would suggest prepping multiple surfaces so that you have some choice before you lay down any facial features.
You're going to have to get a high contrast on your face again, but not as much as on the last portrait. There is more room for gray areas here. Place transfer paper under face and trace only the darkest outlines. You don't want any lines showing through the gray. Just use the darkest parts as a guide for the lighter shades.
This is a great project to experiment with, using different mediums and washes. For more inspiration check out Vincenzo on etsy.
Sunday, August 29, 2010
DIY Portrait #1
I decided to start with something I am currently interested in, diy portraits. In all honesty they don't have to be all that complicated or expensive. The picture shown was done by John Clark. I found his stuff on etsy while looking for ideas for a-typical portraits that look awesome. This style caught my eye really fast and when I read in the description on one of these that he did it with sharpie, I was sold. So, for this project you will need:
1-Old book you won't mind destroying
2- Sharpie
3- Transfer paper
4- The image you want
I would encourage anyone reading this to check out his stuff on etsy for ideas, or heck, buy something. Like I said, I think it's awesome and makes a strong impact.
Get the picture to the right size, and since I am so poor that I don't even have a printer, I tend to do this on a copy machine. Then, increase the contrast, a lot. You basically want to break it down to two tones, black and white. Place the image where you want it on the page with the transfer paper underneath and trace around the black. This may require some decision making on your part as to where the lines actually are and you might want to do a dry run onto some scrap paper before trying this technique on the book page.
When the lines are in place, simply fill them in with sharpie. Overall, it is a pretty simple approach to making a portrait because you don't have to worry about those difficult skin tones, and while tracing is cheating in a way, it sure makes things easier. If you're a purist, sketch everything out by hand, but I'm just trying to make this as easy as possible.
A note on the book you choose: obviously some of the text will be visible so if anyone does decide to try to read the page you're displaying, I would recommend choosing something you're not embarrassed of. I chose a paperback on American literature I bought at Goodwill for 99 cents.
Also, Mr. Clark generally chooses to keep specific lines revealed, as he did in this picture (fight for her) which I choose not to do. It is an option though.
Subscribe to:
Posts (Atom)